I posted this guide both here and on the official forum about a month ago, and I've been spending a lot of time updating the forum version over the last 2 weeks. The moderators stickied it on the official forum last week. I only just remembered that I ought to update my guide here, so I've deleted the old thread and created this new one. The link to this guide on the official forum is here:
https://forum-en.guildwars2.com/forum/professions/elementalist/The-Ele-Meta-Dungeon-Speed-Clears/first#post3112677. Please post questions and comments there, as I check that forum more often.
DISCLAIMER:Most of the following content does NOT consist of my own original ideas. Rather, it is a compilation of bits of information gathered from multiple other threads, and more importantly, it includes best practices used by top speed-run guilds.
This guide is intended for use in all Story-Mode and Explorable Dungeons, and Fractals up to lvl 30. The builds specified in the guide can be used for Fractals 31-40, but many players choose not to. It is not intended for use in PvP, WvW, or Fractals above lvl 40.
This guide is oriented towards players who do PvE content in zerk groups, and would like to maximize their groups damage, which is the best way in which they can help their group. The term zerk groups includes both organized guild runs and pugs who ping zerk gear yes, you CAN pug with these builds!
Settings:- Turn on AoE Loot On Interact
- Turn on Autoloot
- Turn on Show Skill Recharge
- Turn off Disable AoE Rings
- Turn off Autotargeting
- Turn off Melee Attack Assist
- Set Targeting to Instant or Fast-Cast
Assumptions & Variables:All builds assume the following:
- Zerk ascended trinkets without stat infusions
- Zerk ascended weapons (for s/f, force + night/dungeon [15% modifier]; for staff, night/dungeon [10% modifier])
- Scholar Runes
- Powerful Dungeon Potion (10% modifier)
- Discipline Banner (170 prec & 15% crit dmg)
- Strength Banner (170 power & 170 condi dmg)
- Arcane Brilliance healing skill
- Signet of Fire (180 prec) & Arcane Wave Utilities; Lightning Hammer for s/f, Arcane Blast for staff
- A burning, bleeding, vulnerable target
- You have perma: Fury, 25 Might, 5 boons total, 50% uptime on full endurance
- On the staff build, 100% uptime on Arcane Lightning (10% crit dmg)
- On the s/f builds which have Arcane Lightning, 50% uptime on the 10% crit dmg.
- On all s/f builds, Conjure Lightning Attributes (180 prec & 5% crit dmg)
Variables used to optimize each builds damage:
- zerk/assassins exotic armor mix
- 250 power/prec from bloodlust/perception stacking weps
- Food, either Sweet&Spicy (100 power & 10% crit dmg) or Curry (100 prec & 10% crit dmg)
My calculations can be reviewed here:
https://drive.google.com/file/d/0B-zwZEZiI96oWElFeVpPMjhseUk/edit?usp=sharing (There are tabs for both Exotic and Ascended armor. The following builds assume Exotic armor for the zerk/assassins mixes, but if you're using Ascended, refer to the relevant tab in the spreadsheet instead.)
Which Build Should I Use?You should use different builds based on what your group needs. The following link contains a diagram that shows various builds (also attached at the end of this post). Each build maximizes your personal DPS within the given constraints (does the group need me to stack Might? Fury? Vuln? Etc.).
Ele Meta Build Diagram:
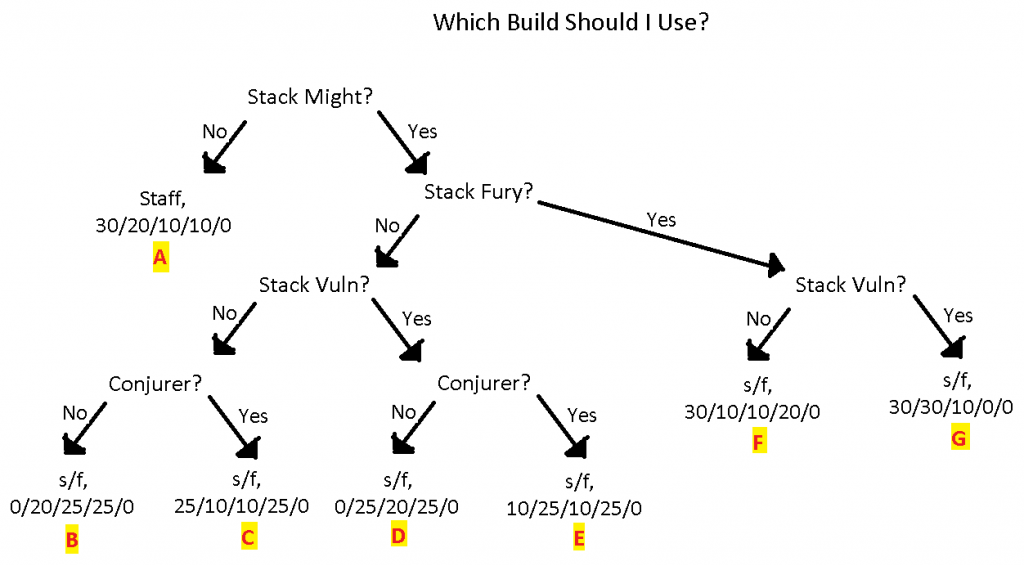
Each of the following builds is labeled
A through
G, which refers to its place in the previous diagram.
The Builds:A: Staff, 30/20/10/10/0Might? 9 stacks for first 20 secs, 6 stacks with 66% uptime after initial 20 secs
Fury? perma for first 30 secs, 66% uptime after initial 30 secs
Vuln? - No
=== Traits: ===
- Fire: (30) (VI)(VII)(XI)
- Air: (20) (VI)(VII)
- Earth: (10) (VI)
- Water: (10) (VI)
- Arcana: (0)
=== Variables: ===
- Zerk: Gloves, Legs, Boots; Assassins: Head, Shoulders, Coat
- Perception Stacking (Precision)
- Sweet&Spicy (power/crit dmg)
B: S/F, 0/20/25/25/0Might? 21 stacks with 66% uptime; 25 stacks with 100% uptime if fire fields from external source
Fury? No
Vuln? - No
Conjurer? - No
=== Traits: ===
- Fire: (0)
- Air: (20) (VI)(VII)
- Earth: (25) (IV)(VI)
- Water: (25) (IV)(VI)
- Arcana: (0)
=== Variables: ===
- Zerk: Coat, Gloves, Legs, Boots; Assassins: Head, Shoulders
- Bloodlust Stacking (Power)
- Butternut Squash (prec/crit dmg)
C: S/F, 25/10/10/25/0Might? 21 stacks with 66% uptime; 25 stacks with 100% uptime if fire fields from external source
Fury? No
Vuln? No
Conjurer? Yes
= Traits: =
- Fire: (25) (II)(V)
- Air: (10) (VI)
- Earth: (10) (VI)
- Water: (25) (IV)(VI)
- Arcana: (0)
= Variables: =
- Assassins: Full
- Bloodlust Stacking (Power)
- Butternut Squash (prec/crit dmg)
D: S/F, 0/25/20/25/0Might? 21 stacks with 66% uptime; 25 stacks with 100% uptime if fire fields from external source
Fury? No
Vuln? - Yes
Conjurer? - No
=== Traits: ===
- Fire: (0)
- Air: (25) (VI)(VII)
- Earth: (20) (IV)(VI)
- Water: (25) (IV)(VI)
- Arcana: (0)
=== Variables: ===
- Zerk: Legs; Assassins: Head, Shoulders, Coat, Gloves, Boots
- Bloodlust Stacking (Power)
- Sweet&Spicy (power/crit dmg)
E: S/F, 10/25/10/25/0Might? 21 stacks with 66% uptime; 25 stacks with 100% uptime if fire fields from external source
Fury? No
Vuln? - Yes
Conjurer? - Yes
=== Traits: ===
- Fire: (10) (II)
- Air: (25) (VI)(VII)
- Earth: (10) (VI)
- Water: (25) (IV)(VI)
- Arcana: (0)
=== Variables: ===
- Zerk: Legs; Assassins: Head, Shoulders, Coat, Gloves, Boots
- Bloodlust Stacking (Power)
- Sweet&Spicy (power/crit dmg)
F: S/F, 30/10/10/20/0Might? 21 stacks with 66% uptime; 25 stacks with 100% uptime if fire fields from external source
Fury? perma
Vuln? - No
Conjurer? - Yes
=== Traits: ===
- Fire: (30) (II)(VI)(XI)
- Air: (10) (VI)
- Earth: (10) (VI)
- Water: (20) (IV)(VI)
- Arcana: (0)
=== Variables: ===
- Assassins: Full
- Bloodlust Stacking (Power)
- Butternut Squash (prec/crit dmg)
G: S/F, 30/30/10/0/0Might? 21 stacks with 66% uptime; 25 stacks with 100% uptime if fire fields from external source
Fury? perma
Vuln? - Yes
Conjurer? - Yes
=== Traits: ===
- Fire: (30) (II)(V)(XI)
- Air: (30) (VI)(VII)(X)
- Earth: (10) (VI)
- Water: (0)
- Arcana: (0)
=== Variables: ===
- Zerk: Coat, Gloves, Legs, Boots; Assassins: Head, Shoulders
- Bloodlust Stacking (Power)
- Sweet&Spicy (power/crit dmg)
Basic Ele Information:Using Fiery Greatsword:FGS does maximum DPS in the game, no doubt about it. But only if your target is backed up against a wall or in a corner. Deselect all targets, then use Fiery Rush (FGS 4) into the wall. You will see a LOT of ticks. While Fiery Rush is on CD, use the 3 attack into the wall (this is nearly identical to a Warriors Whirlwind (GS 3)). While both the 3 and 4 attacks are on CD, use the 5 attack if your enemy has a large hitbox or if there are multiple enemies grouped together in the corner. If there is only a single enemy or 3, 4, and 5, are all on CD, auto-attack. You dont usually need to select a target for the auto-attack to hit, but if you do, remember to deselect before using Fiery Rush again.
Aiming Dragons Tooth:With S/F and S/D builds, you start off your Might rotations with Fire 2 (Dragons Tooth). To make it drop in front of your toon within melee range, angle the camera up to the sky, then move forward a bit. Wait a sec, then cast Dragons Tooth. Quickly move forward slightly and cast Fire 4 to make Dragons Tooth combo Area Might.
Aiming Phoenix:With S/F and S/D builds, when stacking Might on boss, you want to cast Fire 3 (Phoenix) slightly behind the boss, but still within your fire field, so it combos Area Might and hits the boss 3 times.
Stacking Bloodlust or Perception:Upon entering an instance, equip a Scepter and Dagger (OH Dagger has better AoE than Focus). If youre stacking Bloodlust, ensure both have Bloodlust Sigils; if youre stacking Perception, ensure both have Perception Sigils. Using 2x of the same stacking sigil will cause each kill to give you 2 stacks. After youve reached the cap of 25 stacks (meaning after 13 kills), wep swap to non-stacking weps, either Staff (if using
Build A) or Scepter/Focus (if using
Builds B-G). You will retain your stacks even though your stacking weps arent currently equipped.
Pre-Stacking Might with S/D (your Bloodlust/Perception weps):Fire 2 > Fire 4 > Fire 3 + Earth Atune while casting > A. Brilliance > Earth 4 + A. Wave while casting > Earth 5 + Water Atune while channeling > Conjure Lightning Hammer (summon 2nd hammer on top of boss)
Summoning the LH on top of boss will not put you in combat. This rotation provides 18 Might, counting only your own blast finishers.
Stacking Might on Boss with S/D (your Bloodlust/Perception weps):Fire 2 > Fire 4 > Fire 3 + Earth Atune while casting > Earth 4 + A. Wave while casting > A. Brilliance + Water Atune while casting > Conjure Lightning Hammer (summon 2nd hammer on top of boss)
This rotation provides 18 Might, counting only your own blast finishers and your own fire field.
Pre-Stacking Might: Other ProfessionsIt is virtually guaranteed that there will be 1x strength and 1x discipline banner in your group, since most groups have 2 wars, and even if there is only 1, he should be using both banners. When you cast your fire field (Lava Font, Flamewall, or Ring of Fire), the wars should summon their banners inside of it to combo Area Might. Then, each person should pick up a banner and use the 5 attack within the field to combo more Area Might. Your group will reach 25 Might just with your own blast finishers and those from the banners. Stacking Might this way is best done before engaging the boss.
Playing the Staff Build (A):Prior to engagement, stack Might with the following rotation:
Earth 2 + Fire Atune while casting > Fire 2 + A. Wave while casting > Arcane Brilliance
This rotation provides 9 Might. Once youve placed Lava Font, your group should stack more Might via banners.
Upon engagement, when not using FGS, sit in Fire Atune and spam 1, 2, and 3 with Staff in melee range. If the boss has a large hit-box, spam 5 as well. If the boss is pushed against a wall or into a corner, face away from the corner and use 4 it works just like Fiery Rush. Spam until the boss is dead. To restack Might during combat, use Arcane Brilliance and Wave on top of Lava Font.
When using FGS, stack Might, summon FGS, have someone else in the group pick it up, then pull boss into a corner and kill him. Hell go down in seconds.
Playing the S/F Builds (C, E, & F):Prior to engagement, stack Might with the following rotation:
Fire 2 > Fire 4 > Fire 3 + Earth Atune while casting > A. Brilliance + Earth 4 while casting > Summon LH + Water Atune & A. Wave while casting (summon 2nd hammer on top of boss)
This rotation provides 15 Might. Once youve placed Flamewall, your group should stack more Might via banners.
Upon engagement, execute 6 complete LH AA chains, then swap to Fire Atune, execute 2 more complete LH AA chain, then drop the LH.
The rotation from this point until the boss dies is as follows:
Fire 2 > Fire 4 > Fire 3 + Earth Atune while casting > A. Brilliance + Earth 4 while casting > Water Atune > Water 5 + A. Wave while casting > summon/pick up LH > 6 complete LH AA chains > Fire Atune > 2 complete LH AA chains > drop LH > [repeat]
Assuming you have no lag whatsoever and your Flamewall is the only fire field, this rotation provides 24 Might. If you have some lag, this rotation will provide 21 Might. The 21 Might version is shown in the following vid (pretend the Boon Durations are Might Durations - it was an error on my part):
Ele Meta: s/f LH - Post Dec 10th:
http://www.youtube.com/watch?v=EeRhQ40ckQ4Playing the S/F Build (G):Same as
Playing the S/F Builds (C, E, & F), except that you swap to Air Atune after Water 5 (Comet) and you AA with the LH in Air the entire time.
Playing the S/F Builds (B & D):Prior to engagement, stack Might in the same way as
Builds C, E, F, & G.Upon engagement, execute 5 complete LH AA chains, then swap to Air Atune and execute 1 complete channel of the AA, and use Air 2 and 3 while channeling it. Then swap to Fire Atune.
The next part of your rotation is as follows:
Fire 2 > Fire 4 > Fire 3 + Earth Atune while casting > A. Brilliance + Earth 4 while casting > Water Atune > Water 5 + A. Wave while casting > pick up LH > 5 complete LH AA chains > Air Atune > Air AA channel + Air 2 & Air 3 while channeling > Fire Atune > Fire 2 > Fire 4 > Fire 3 + Earth Atune while casting > A. Brilliance + Earth 4 while casting > Water Atune > Water 5 + A. Wave while casting
If the boss isnt dead by this point, youre kittened. Without Conjurer trait, these 2 builds do not have 100% uptime on LH when not Might-stacking, the way
Builds C, E, F, & G do. Therefore, after your 3rd Might-stacking rotation, if the boss isnt dead, youre forced to AA with Scepter since your Summon LH utility is still on CD.
When to Use Might Duration Runes (2x Fire, 2x Pirate, 2x Hoelbrak)Two of the constants used for optimizing the respective Effective Powers of
Builds A-G via the previously mentioned variables were: 1) Scholar Runes; and 2) perma 25 Might stacks. However,
Builds B-G can only provide perma 25 Might stacks to the group in Scholar Runes if there are perma fire fields, usually given by: a Guard using PF/HG, a War using LB f1, or party members spamming Embers.
If there are not fire fields from an external source, and you are the only party member giving Might, is it better to use Might Durations than Scholars? If the fight lasts longer than 20 secs, the answer is YES! Heres why:
Might provided by an S/F build in Scholars, with 0% Might Duration:
21 stacks with 66% uptime = an average of 14 stacks for each of the 5 party members, plus personal bonuses of 165 Power, 8% crit dmg, and a 10% dmg modifier for you via Scholar Runes.
Might provided by an S/F build in Might Durations, with 60% Might Duration:
21 stacks with 100% uptime = an average of 21 stacks for each of the 5 party members, plus a personal bonus of 75 Power for you via Might Duration Runes.
Simplifying it, the comparison is:
Scholars: 8% crit dmg & a 10% dmg modifier for you
Vs.
Might Durations: 155 power & 245 condi dmg for you, and 245 power & condi dmg for EACH of your other 4 party members
Just looking at the total additional Power from all that additional might (1135 Power), you can tell that theres really no comparison. Furthermore, factor in the 1225 condi dmg and what thatll do to the burns via guard/ele and bleeds via war/mes/ele, and it becomes even more obvious. Therefore, if a boss fight will last longer than 20 secs and your group is not giving your fire fields, its better to swap to Might Duration gear. This most often applies to zerk pug groups, since organized guild runs usually kill bosses within the initial 20 secs.
Build A: Why Not Use Blasting Staff?30/20/10/10/0 with Arcane Lightning is better than 30/10/10/10/10 with Blasting Staff. For PvE, since the boss is a single target and standing still, Blasting Staff does not effect your Fireballs and Lava Fonts in any meaningful way, in regard to DPS. The only thing it does is increase the blast area of each individual meteor in Meteor Shower, causing more meteors to hit your target, and resulting in higher damage from that one skill.
So what you need to do is weigh that increase in Meteor Shower damage against: perma 10% crit dmg from Arcane Lightning, perma 10% crit dmg from extra 10 in Air, 100 prec from extra 10 in Air. Since the majority of your damage will be done by Fireballs and Lava Fonts, even against targets with large hitboxes, the choice is obvious. The extra 10 in Air is FAR superior to 10 in Arcana.
 Recent Posts
 , changed 4 majors, transferred overseas, and finally graduated with first-class standing. So I spent 7 years to get my bachelor's degree. Why that happened? WoW and DOTA in my second and third year, so I didn't balance play, life and study. So after I got transferred into this Canadian university, I finally found a major that I enjoy (Accounting), then I studied hard and didn't touch any MMOs during my study. Then here I am, graduated last week, got an admission into an 8-month graduate program that will bring me to the final exam of CPA. So I have time to play MMO before the program starts, the difference is I know what I want in real life and what can achieve in games.
